This article appeared in the September 2019 Quarterly Edition of News and Views
Life After Unicef Ronald Van Dijk
It all began with moving to our new house in Malaysia straight from my last duty station Kinshasa, the DRC, where I had served since 2008. During the first years after retiring in 2012 I did a number of consultancy jobs of which some were very interesting. This was “retirement life”, … or was it? It took some time to work out what “retirement” meant, especially with consultancy and other job offers continuing to come in. Flattering though it was, I began to realize that if I wanted to do something else than social research and analysis, program planning and management as I had done for many years, I had to step out of that kind of work entirely and focus on something new. It was not easy to do after a successful career in social anthropological research in the Arab world and health program management followed by over two decades in UNICEF in Africa and Asia.
From 2016 onward I focused on music, on literature, on studying and sometimes publishing a bit about my profession of social anthropology and economics. I learnt a lot about carpentry and built some fine furniture. Together with my wife Effie I renovated our house and developed a big garden, a fishpond with stingrays, a chicken house with silkies. I took time to travel with our grown-up children in Malaysia and in Europe, visited museums, theaters, art exhibitions, etc. Time is short since you don’t know how much you have left and there is so much to see, so many things to do. I soon discovered that retirement, at least in the way we live it, is a full-time job. No time to lose.
Within that context I have started to make some music recordings as an amateur European classical flutist (chamber music, solo and duet). It is a lot of work, practicing, experimenting, studying and enjoying. I have sent some of these recordings as a contribution to the September issue. I hope you like them (Yes, I will use some to accompany your article, Ronald!) (Maybe better in a separate publication in the December issue, as you already suggested.). Furthermore, I am documenting the construction of a wooden yacht that I began to build in 2018. At this moment, August 2019, I am probably half way through and hope that my co-retirees would enjoy reading about the progress I have made so far.
This boat-building story is written for an audience unfamiliar with the construction of boats and has little or no experience with the handwork that comes with it. Here and there it goes into some technical details, explaining things, but also elaborates on some hilarious situations encountered in a country where retirees don’t work and don’t get their hands dirty.
In Europe, Australia and the USA, that kind of pastime is not uncommon, but in Malaysia it is very rare. “You hire someone to do the job, you just chill and relax,” is what our bank manager advised when we arrived in Malaysia and opened an account. It also meant that as a semi-professional “do-it-yourselfer,” I have become a regular client of some hardware shops and construction companies where professional contractors make their purchases. Every now and then I end up in funny situations of having to explain to a factory manager that I don’t need a ton of his steel rods, but just a few meters.
So, here is Part 1 of my boat building story in Malaysia…
|
Building Calyndrix II: Update August 2019 | ||
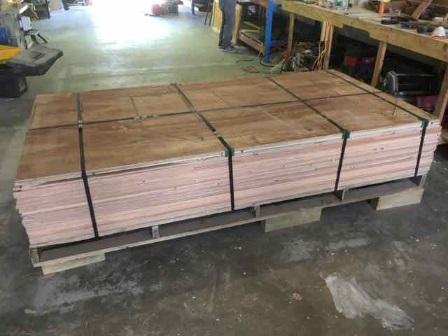
After several years searching the internet and looking at different wooden boat designs, I selected the design “Jewell” of the French naval architect François Vivier. It is an 18 foot (6 meter) yawl rigged two-masts sailboat, clinker built or lapstrake of plywood and solid wood using epoxy to put it all together. It has a replacement of just over one ton. Once I had purchased the building plan and drawings from Vivier who sent me the package by postal mail, I bought the plywood from boat builder, Tony O’Connor in Perth, a by Vivier licensed supplier in Australia. He delivered the set of 36 sheets of computer-navigated-cut (CNC) Okoumé plywood, which means that all the parts of the boat have been lined out and are partly pré-cut as per Vivier’s design. The boat will have the name “Calyndrix II” after the boat that I had in Fiji when we lived in the Pacific and where my children came up with the name. | ||
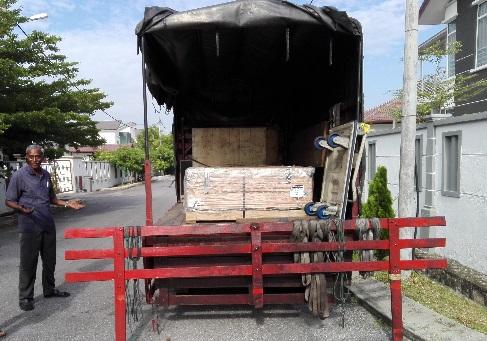
Buying the plywood was one thing, but getting it into Malaysia proved to be a whole different matter. I assumed that importing goods from Australia would fall under the Malaysia-Australia Free Trade Agreement (MAFTA), but I was wrong. Also the “door-to-door” contract that I had agreed upon with the supplier in Australia did not work out as expected. The shipment had been picked up at O’Connor’s workshop in Perth, taken by sea to Singapore and then on to Port Klang in Malaysia where it was expected to be cleared for import. The company in charge of customs clearance would also organize transport and delivery to our house. So, when one morning I was called and told that the plywood had arrived in Port Klang I became very excited. The guy at the other end of the line asked me what import code they should use to get it passed customs. I told them that I did not have the foggiest idea what he was talking about and explained to him that I had a door-to-door contract and was of the opinion that it was their job and expertise to deal with those matters. For several days the discussion continued by phone, email, sms and whatsapp. The problem was that nobody understood what a set of CNC cut plywood actually was, or what purpose it had. “Why importing plywood from abroad while Malaysia is producing its own plywood?” “For building a boat, …. out of wood?” “The time of wooden boats has passed, Sir. Nowadays we use polyester,” was one of the somewhat condescending reactions I got. The actual problem was that nobody absolutely knew in what category of the customs bureaucratic system this shipment would fit and what import code and import duty it should have. It was the month of Ramadan, the month of fasting between sunrise and sundown, and consequently the month when Government officials slowed down and everything more or less came to a halt by the end of the month when the festivities of “Eid-al-Fitr” would be starting. So, it came as a surprise when I received a call just before “Eid '' that it was all sorted out and if they could deliver it the next day. The only problem was that their transporter could not offload the 750 Kg package upon arrival at our house since he did neither have a forklift nor a hydraulic crane on his truck. | ||
| ||
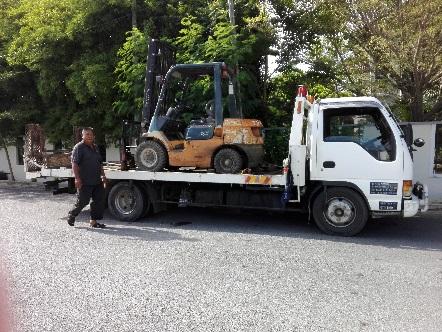
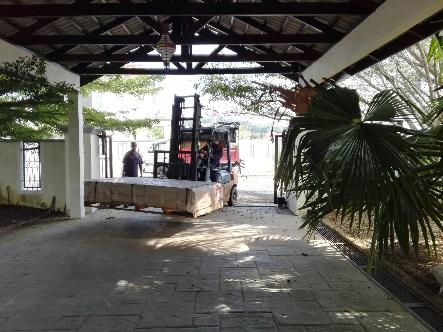
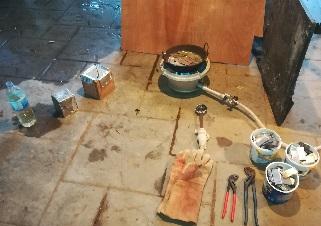
I went to all kinds of companies in our neighbourhood that might have a forklift that I could borrow or rent, such as building companies, transport agencies, big warehouses, etc. One of them was willing, but took advantage of the situation and asked an astronomical price. Fortunately I got help from Ms Jacqui, the owner of a company trading in bricks and tiles located in the nearby village of Lukut. Previously we had bought some tiles and other materials there. The five km to our house was too much for the forklift to drive since it would ruin its solid rubber tyres. Jacqui knew of another company that could transport the forklift on a small deep loader. When the day was decided and the hour agreed, time planning became important. The truck with the plywood had to come from Port Klang, about four hours from our house depending on traffic. The deeploader could come anytime, but needed first to pick up the forklift from Jacqui’s company in Lukut. Surprise, surprise, it all worked out well. The job itself took only a few minutes before the plywood shipment was carefully placed in our carport. I was wrong in thinking that this was the end of the saga. About six months later I received an email from Tony O’Connor in Perth that the freighter had approached him for payment of the remaining import duties in Malaysia equivalent to not less than A$1,000. A tax neither he nor I had foreseen to be so high. After some email exchanges we decided to split the costs since he needed to continue with the same freighter and could not afford to be blacklisted. | ||
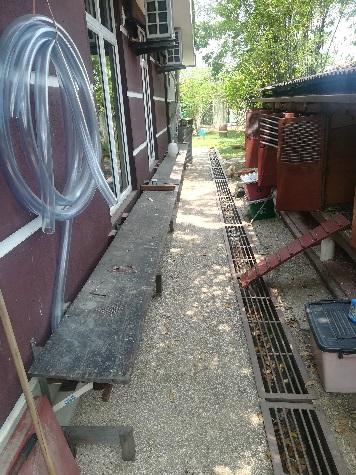
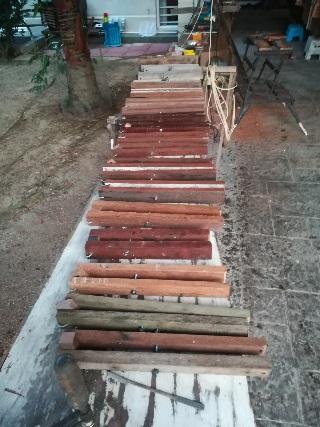
Earlier, we had discovered a company that sells “recycled wood” some twenty km from our house. Ms. Wong, the company’s manager, buys wooden houses, usually in villages, when the owners want to replace it with a brick house. The old house is taken apart, plank by plank and beam by beam, and transported to the workshop where nails and other metal is removed. The timber is then sorted and stored according to size and types of wood under roofs that protect it from rain and sun. Wooden houses in Malaysia have mostly been built from Chengal wood. Chengal or Neobalanocarpus heimii, is sometimes referred to as “Malaysian teak”. It is extremely hard and can resist rain and sun and stay in relatively good condition even without a layer of paint. It is very heavy and has a density close to 980 kg/m3, which means that it is almost as (dense) heavy as water. We have used Chengal for all outdoor structures, such as the 11-meter-long car port extension needed for the boat plus the family car, the 20-meter-long deck that I had built in front of the house, a 12-meter chicken coop + pen at the back of the house, a garden table and several pieces of furniture inside the house. Some of the trims for the boat needed to be very long, almost eight meters, such as the clamps at the outside of the hull. This posed a transport problem because Ms. Wong did not have a flatbed truck long enough and thought it a waste of money to rent one. Transporting it on a shorter truck would be illegal and risk a heavy fine from the traffic police. In the end Ms. Wong decided to load it on her smaller truck and avoid the risk of being fined by delivering it at six o’clock in the morning. “The police are still asleep at that early hour,” she said. At last I could begin. | ||
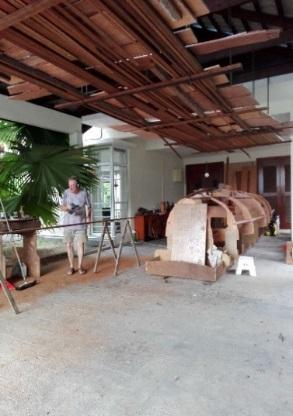
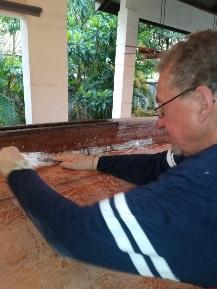
With the help of Blake, my son-in-law, I moved the 36 plywood sheets into the workshop that we had built next to the house, and cut the pré-cut parts (almost 200 pieces) one by one out of the plywood sheets. The edges of each piece of wood had to be smoothed with a handsaw and wood rasp, and sanded on all sides before applying the first layer of epoxy. Then each piece was sanded again to receive a second layer of epoxy. Since it was impossible to do it all at once, I did the plywood sheets one by one so that I had not more than ten to fifteen plywood boat parts at a time. Meanwhile, I put the building-frame together on top of which the boat was going to be constructed. When the bulkheads were ready and mounted on the frame, I used it as a”drying rack” for the epoxied pieces of wood. It all was a very tedious job: dust, dust, dust. | ||
| ||
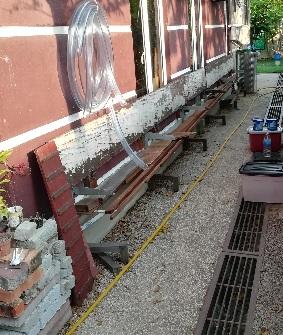
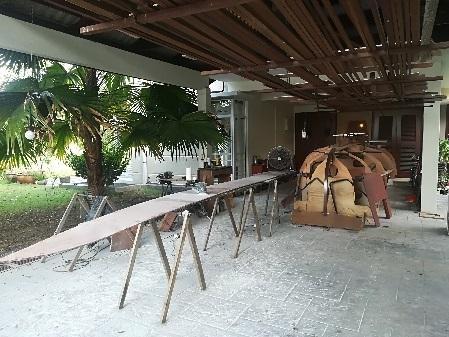
At the side of the house I made a special storage to keep the very long (up to eight meter) pieces of hardwood bought form Wong’s company. Protected from rain and sun the planks, rails and shingles could stay there. Another storage space I created in the carport using ropes tied to the rafters to make a hanging platform high enough to park the car underneath and wide enough to store boat parts made of plywood and long solid wood pieces. On all pieces, big and small, I put stickers with numbers corresponding with the list in Vivier’s building plan. | ||
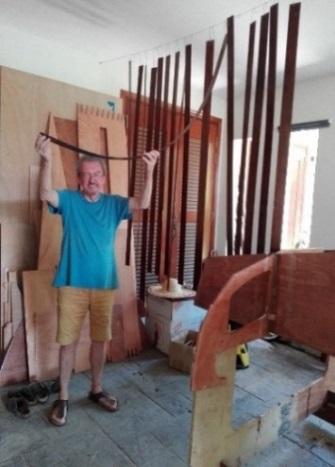
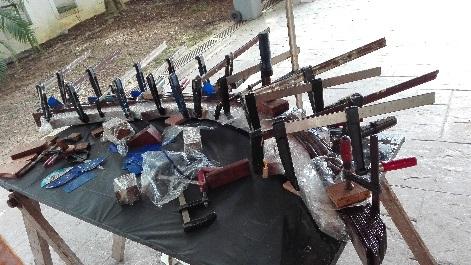
Next came the preparation of the trims. Most of the planks that I had bought were rather thick, but never more than 60 mm since my circle saw has a maximum depth of 30mm, just enough when cutting a plank from both top and bottom. To flatten the planks I used an electric planer. The circle saw and the planer make both a hell of a lot of noise and to protect my ears I use a good quality headset. | ||
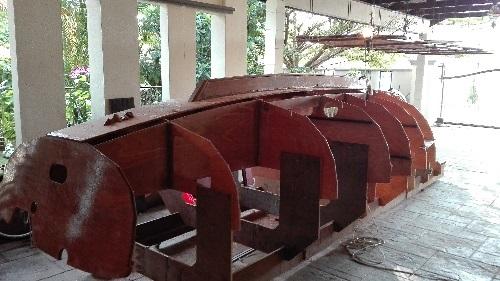
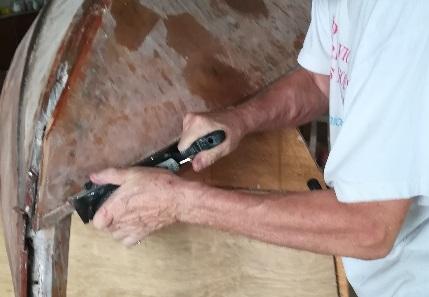
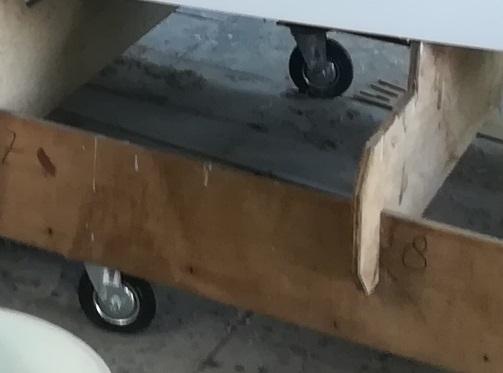
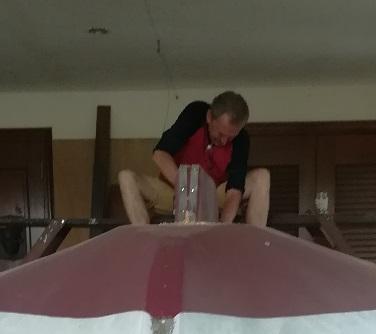
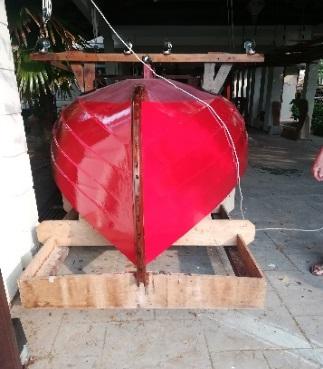
The plywood bulkheads I reinforced with solid wood trims and mounted them on the frame. Then came the construction and placement of the center board box (compare 1st and 2nd picture). It is a crucial part of the boat and houses the center board that can be lowered (1¼ m) underneath the boat into the water when the boat is under sail enabling it to sail sharp into the wind. When coming into shallow waters or when pulling the boat on the trailer, the center board will be hauled up reducing the draft to just 36 cm. | ||
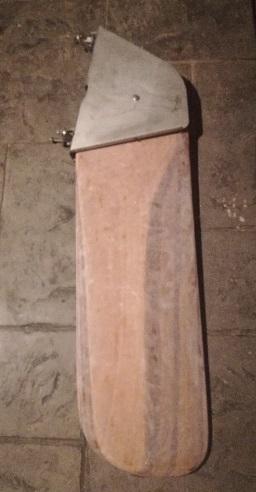
To build the false stem or “the bow” of the boat, I cut very thin planks, then planed them ever thinner till a thickness of circa 3mm was reached that allowed me to bend them without breaking. Each of the thin planks was put in epoxy. After hardening and sanding, I put them again in epoxy, and, while still wet, bend all 16 of them at the same time in shape using the real stem (wrapped in plastic) as a mould. It was a very tricky operation. The resistance of the 16 thin planks together was so strong that every clamp available had to be used. | ||
The result is an extremely strong false stem that fits nicely. Later on, I will shape it further by sharpening the front. | ||
Next step– the keel box. This is the box underneath the bottom of the boat that will house the ballast of about 120 kg of lead to stabilize the boat and prevent unnecessary heeling. It is built over and around the centerboard case. | ||
Constructing and fixing the “garboard” (an old Dutch word) is the first plank that reaches from the bow till the transom. It’s composed of three pieces of plywood fixed together with “finger joints” and measures about 640 cm. It is a difficult plank to place because it is quite wide and has to be bent over the bulkheads of the boat, but is also twisted lengthwise following the line of the boat. All kinds of clamps and pieces of support wood were needed to get it properly in place. The connection between the garboard and the bottom plank is done according to the “tie and stitch” method, which comes down to laying the garboard as tight as possible against the bottom plank and closing the small gap in between with glass fiber cloth and epoxy. It’s a rather precise job that requires good preparation since the final and definite fixing of the plank has to be done in less than 20 minutes due to the fact that the two components of epoxy harden here in the tropics very quickly, even when using a slow hardener component. | ||
Once the garboard had been fixed it was time to finish the keel and lead ballast. I needed to fit 120 kg in the limited space of the keel box and another 30 kg in the centerboard. Finding the lead was the first problem. Mr. Liew from Western Synergy building company and a good friend of ours, knew where to go. He and his wife took me to a shop in Seremban where they make pots and pans using lead for soldering. To test it, I bought one kg and, making use of Archimedes’ famous discovery, calculated the density (weight per volume). I discovered that its density was only 10.3, which is too low and meant that I would not be able to fit 120 kg in the space available in the keel box. When explaining the problem to Mr. Liew, he brought in Mr. Zaidi, another friend who comes often to our house. Zaidi knew a place where fishermen buy their sinkers. Again, I bought 1 kg and, when testing it, I found a density of 13.5! Melting portions of the lead in a casted iron pot on a burner turned me into a plumber. Lead melts at 320 degrees centigrade and becomes fluid like water and looks like silver. I poured it in a small mould that would produce blocks of about 12 kg. I adjusted the measurements of the mould for each block individually to get a precise fit and a maximum quantity of lead into the space of the keel box. It worked out better than expected: 126 kg lead fitted in the keel box. Once all the blocks were in the keel box, the remaining space between the blocks was filled up with epoxy. The box was closed with a strong plank and reinforced from the outside with a double layer of glass fiber cloth and epoxy. | ||
| ||
Next was the center board, which had to be made out of three planks of plywood, each 18 mm thick. In the middle plank an empty space was left open to house the ballast. I poured 27 kg of lead in an especially made mould. The total weight of the centerboard became 37 kg. I planed the center board into a NACA profile (torpedo shape) to reduce resistance in the water when sailing. The same process, but with just two plywood planks and without adding lead, was followed to make the rudder. The head of the rudder is made of marine grade stainless steel (grade 316) that I had ordered from a company in the Netherlands. With the center board fixed and the rudder done, I could now return to the hull of the boat and start with the planking. | ||
| ||
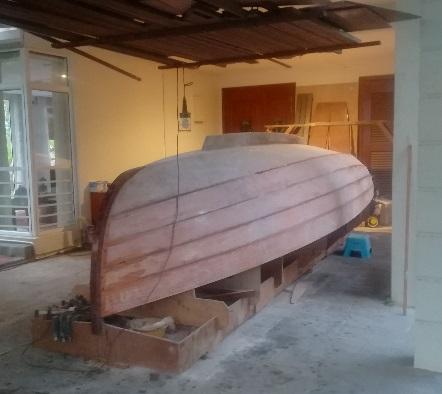
This boat is lapstrake built, also called “clinker built”, but instead of “clinkers” or rivets, the connections between the hull planks are made with epoxy. With lapstrake building each plank overlaps 2 to 2 ½ cm the previous plank. Construction wise it is very strong since the overlap doubles the thickness of the hull plank over the entire length of the boat. Only in the front end where the planks come to the stem, the thickness of the overlap is reduced by cutting rabbets or “rebates”. The result is a smooth surface at the bow of the boat. A rabbet or rebate plane was needed for this job. I searched without success in several hardware shops, but no one seemed to know what I meant and even a picture did not help. On the internet, I discovered a wooden rabbet plane in the collection of the Multifila shop in Balakong– a shop for hobbyists an hour drive away. Once in the shop, the owner denied that he had such a plane. He did have a nice collection of old Chinese wood workers tools that he showed me proudly and explained that these were very good tools of high quality, but he did not have a rabbet plane. I took my smartphone and downloaded the website of his shop and showed him the rabbet plane that I had seen and that this was the reason why I had come. All of a sudden, he remembered the plane and said that he had placed it in his private collection behind the counter. Surprise, surprise, he found it. He did not want to sell it, but after some more explanation that I needed it for the building of my boat, he gave in. It was not the end of the story. By the time I needed to use the plane I tried it out on some ordinary timber. It did not do the job. I sharpened the chisel, but again it failed to cut. The iron of which the chisel was made is apparently too soft and made of low-quality steel. Back on the internet I found and bought a Stanley rabbet plane that arrived after three weeks and that works perfectly. The old Chinese wooden rabbet plane is still lying on our coffee table in the living room, just waiting till we visit again the shop in Balakong where I will offer it back to the shopkeeper for his “private collection”. Back to the planking of the hull. | ||
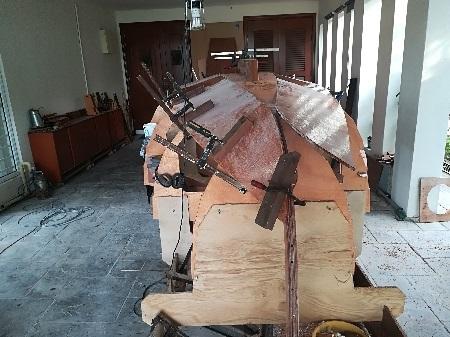
Each plank is composed of three pieces of plywood that I had cut out of the plywood sheets some months ago (see above), then sanded, assembled with finger-joints and epoxied. With that part of the preparation already done, I could work now with planks of about 6 ½ meter long. Before fitting a plank on the bulkheads, the previous plank had to be beveled to ensure about 2 ½ cm overlap and maximum contact surface. Every plank is tried out, small corrections are made in its shape, and tried out again. Then holes for screws are drilled through the plank and into the bulkheads. Although epoxy will glue the planks together and ensure water tightness, short screws are used to secure the position of a plank on the bulkheads and to force the plank on the bulkheads and in the right position. From left over timber I made clamps to press between the bulkheads and the planks on each other. The heads of the clamps are covered in pieces of polyethylene sheet to prevent them from gluing to the planks. | ||
| ||
Once everything is ready: tools laid out, screws, screw drivers, clamps and other tools within reach, I put on rubber gloves and mix epoxy resin with hardener. From that moment on I have about 20 minutes to apply the epoxy, move the plank in the right position, fix the plank with screws onto the bulkheads, and with the help of 23 clamps tighten it on the previous plank. It takes some careful planning, but it works well. Plank after plank is fixed with a day in between to let the epoxy cure and harden. | ||
“Plank after plank, after plank after plank.” Each time ensuring that both sides of the hull are exactly the same. The last plank will determine the sheer line, the lines of the boat that will be most visible. | ||
Ssanding the planks, filling and again sanding to eliminate unevenness and then reinforcing the connections between the planks with extra epoxy to ensure absolute water tightness. The extra epoxy (plus filler) is applied in the grooves between the planks over the length of the boat, which further increases the stiffness and strength of the hull. | ||
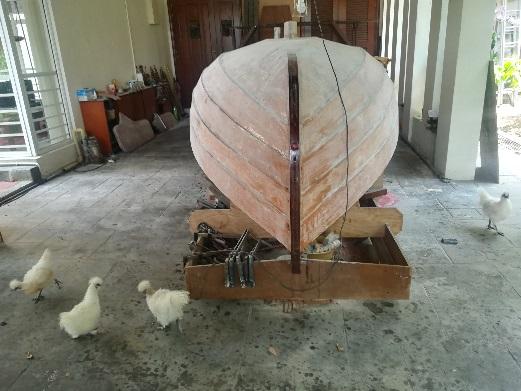
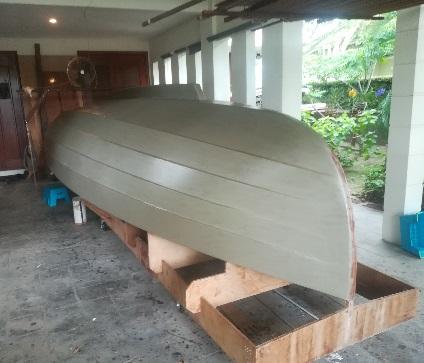
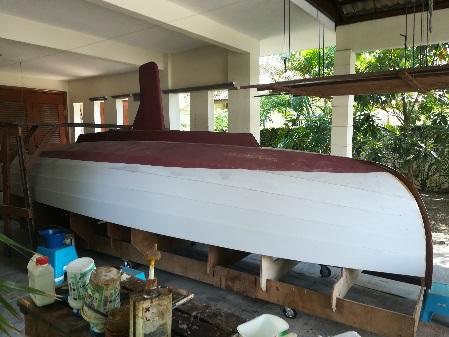
Before going any further the boat had to be put on wheels so that I could move it and place it under the rafters of the carport where I had fixed a couple of pulleys needed very soon (See next pages). From six mm thick L-shaped steel bars I constructed a frame to support the boat and lifted it with a carjack high enough to fix six wheels. After this rather tricky operation was completed, I began painting the hull. | ||
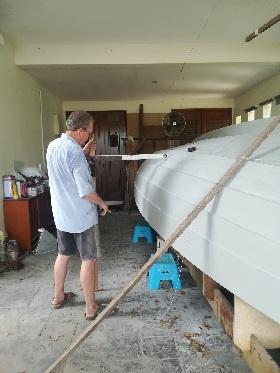
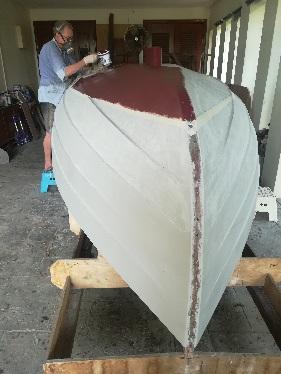
Since the construction of the boat and the finishing of the wood was all done with epoxy, which is a two components chemical composition, a special painting system had to be applied that would attach itself to the epoxy. Epoxy and its particularities are not yet well known in Malaysia and the kind of paint that I needed is not available in the shop. After searching extensively on the internet I discovered that AKZO-Nobel, a Dutch company producing this kind of paint, did have a branch in Malaysia servicing among others the Shell oil tanker ships that export Malaysian petroleum products and liquefied gas. When I called them and explained the problem, they sent a specialist to my house to meet me and discuss the technical details. Fortunately, they did not drop out when discovering that I was not building a 400-meter-long sea vessel but just a six-meter yacht. I must say they helped me very well with all kinds of technical advice. So, I bought the two-component poly-urethane paints for the primer, tie coat, top layer and anti-fouling paints, from them. After applying three layers of the primer and two layers of the tie coat, and sanding in between, I had to figure out what the water line would be before continuing with the anti-fouling paint on the under-water-ship. There are several ways of doing that, but all of them require that the hull is completely horizontal. Unfortunately, the concrete floor on which I was building the boat appeared not to be horizontal, neither lengthwise nor broad wise. To solve the problem, I used a stick on which a spirit level was mounted on a right angle and walked around the hull making markings every 10 cm and connecting the line by hand. With the waterline fixed, I started painting. Later, when the big moment of launching the boat arrives, I would discover if this method has worked, …. or not. | ||
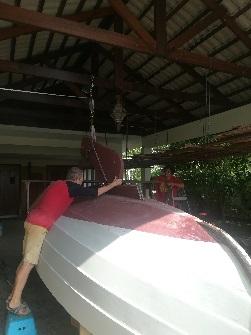
Once the under-water-ship was properly painted, I rolled the boat on its wheels forward and placed it under the rafters of the carport. There I hoisted the centerboard that, with the lead inside weighs 37 Kg (about half my body weight), and lowered it carefully in the center board box and secured it with a brass axle so that it later can be moved easily. The pulley system needed to lower and to hoist the center board already attached to the board. Also, the false stem, the bow, has now been fixed permanently and given a blanc varnish so that the beautiful colour of the Chengal wood stands out. | ||
| ||
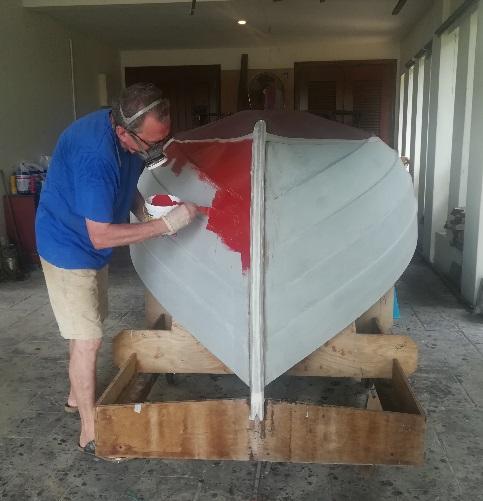
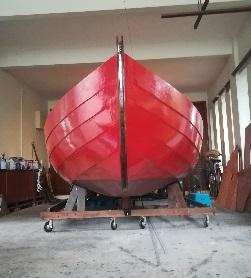
Now that the bottom of the boat is ready, I fixed the center-board in the center-board box to prevent it from falling out during the turning of the hull. The final thing to do now was painting the hull: bright red! | ||
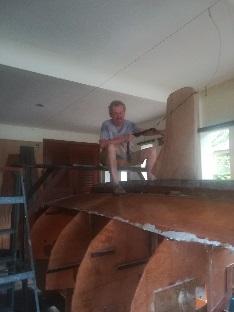
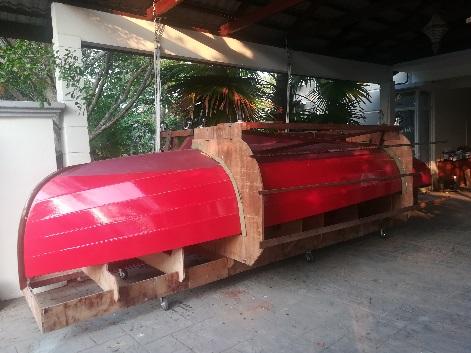
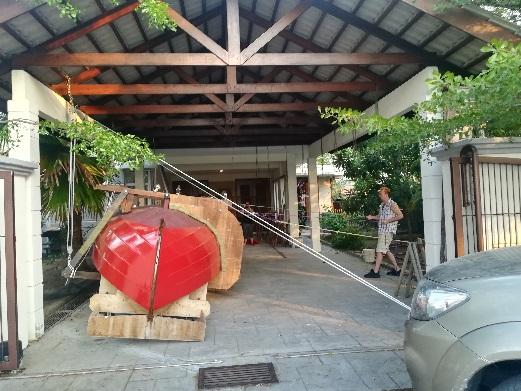
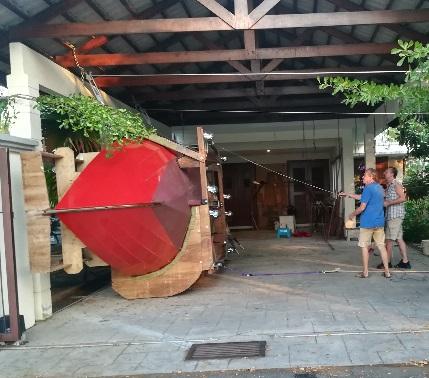
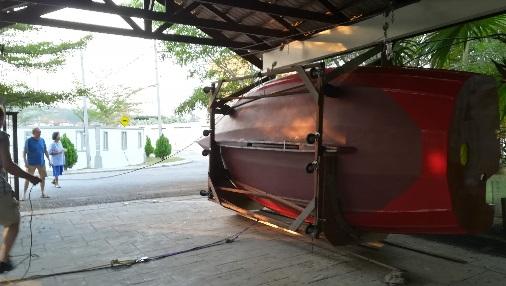
After painting I moved the boat again and positioned it under the rafters where I lowered a wooden carriage on the hull that will support the boat once it is turned. With the carriage in place I constructed from heavy plywood and planks a frame and a cradle to roll over the boat without damaging the painted hull. My daughter and her husband Blake, who live in Kuala Lumpur, came over to help my wife and I for the occasion. Some helping hands were most welcome because this “roll-over” is risky since the hull + building frame + carriage weigh about half a ton. Pulleys and ropes were put in place and knotted to the cradle frame. Mistakes could not be made and some careful planning took place beforehand. | ||
I needed the car to pull-up the hull and put it on its side. Fortunately, the roof construction, the pulleys and ropes held and did not break. | ||
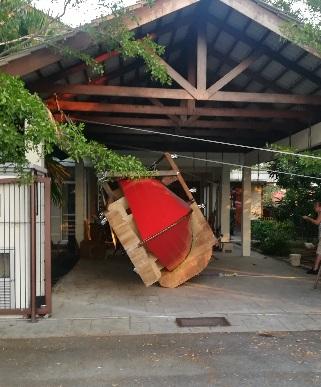
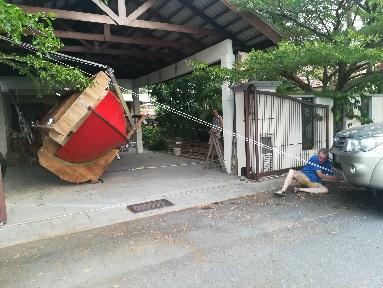
It was an impressive sight to see that hull, weighing half a ton, standing on its side. Lowering to ground level proved more difficult than expected. A very tricky moment was when, while balancing the hull at a 45 degree angle, I had to adjust the ropes before we could get it down. Fortunately, no accidents happened and all went well! The next day, I removed the cradle to let the rest of the fun begin! There remains a lot to be done in terms of construction and painting, such as the cabin arrangement, buoyancy compartments, anchor well, deck, mast foot, coach roof, spars (masts, boom, gaff), ordering the sails from a company in the Netherlands and bringing them to Malaysia. It might take another year or so before I am sailing and discovering the beautiful tropical waters along Malaysia’s coast. The good “news” is that there is no age limit for sailing! | ||


- Get link
- X
- Other Apps
Labels
RonaldvanDijk- Get link
- X
- Other Apps
Comments
Post a Comment
Please ensure you leave your name, bei either selecting your google account (if you have one), or selecting 'name' from the drop down menu. Enter your name there. If confused, leave your name in the text of your comment.